Hear from a family who made the switch from a Montessori school to a Waldorf School in their child’s 3rd-grade year
“After 5 years of Montessori education, we started looking for other options when our oldest child was around 8 years old and our youngest was in kindergarten. We couldn’t really define it at the time, but we knew something was missing from our eldest child’s education. We wished for him to be more engaged and excited about what he was learning. We wanted to see that “spark” alive when we picked him up from school. Our child is very social, and we found that the constant “independent” work left him feeling lonely and isolated. Montessori classes are grouped into three grades, and we felt that the level of education wasn’t matched with his developmental needs. We sought alternatives and toured Susquehanna Waldorf School. We hadn’t considered the Waldorf school before because we perceived it to be a distance from Lancaster. After taking a private tour of the school, we realized it was exactly what we were looking for. I liked that the classes were individual grades with a focus on the developmental needs of children of similar ages. In stark contrast to independent work, most of the subjects were explored and discussed as a group. It was not just the classwork that felt more communal; I instantly saw a broader sense of community among the parents. I was impressed by organized cultural events and the opportunities to be engaged with the school community as a parent. Being in the marketing world, the term “experiential” was something I understood, and when it was explained that Waldorf takes an experiential approach to education, I wished I had discovered Susquehanna Waldorf School sooner. During my tour, I saw how subjects are integrated. There was a class painting a portrait during an Algebra lesson during my tour, and when I asked about it, they explained that they were learning about the inventor of Algebra. I was impressed that so much thought was put into the subject of algebra that both history and art were incorporated into the lesson. It felt like an enriching experience. We enrolled our 3rd grader and our kindergartener for the upcoming year. We noticed a big difference in our kindergartener's experience compared to our first child. The main difference was the amount of outdoor time. We didn’t realize how much of a “forest school” the kindergarten program was, but we were happy with the surprise. Being outside in all weather was a real gift for our youngest child and helped to encourage our family to make time for more outdoor activities in our everyday lives, too. The second big difference was the amount of parent education. Parent education exists in all grades, but we felt like we received essential foundational support from the kindergarten teachers. My husband and I both say that that experience helped us to become better parents. We’ve been at SWS for five years now and are so grateful we made the switch. Understanding that every child is different and may respond differently to these two environments, Waldorf was the right fit for our children. The spark we wanted back is alive for both of our children, and we’re constantly impressed by the depth of education they are receiving at this special place.”
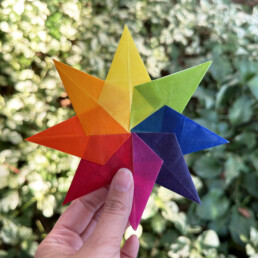
How To Make Waldorf Window Stars
As you explore the classrooms and corridors of Susquehanna Waldorf School, your eye may be drawn to many colorful stars in the windows. Known as "Waldorf Window Stars," these paper creations bring vibrancy and beauty to our school. These stars not only add a splash of color but also capture the essence of Waldorf education, fostering creativity and imagination while reminding us of our connection to nature.
Let's delve into the creative process of making Waldorf Window Stars with this step-by-step guide to crafting these enchanting decorations:
Materials You'll Need:
- 8 Pieces of Square Kite Paper (assorted colors for a vibrant palette or one color for a strong hue)
- Glue stick or craft glue
Step-by-Step Instructions:
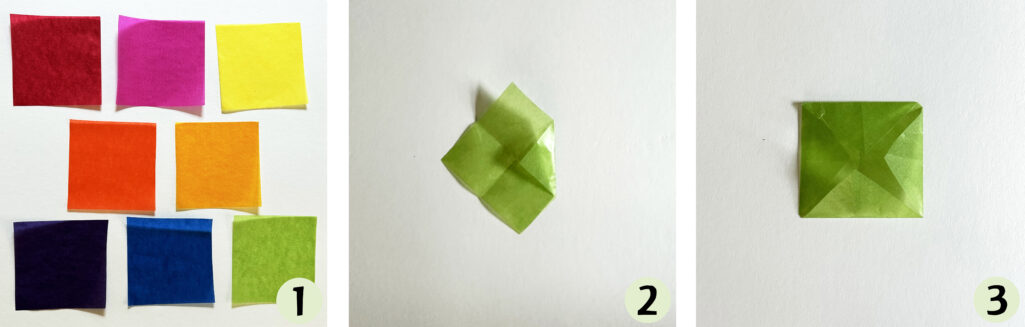
- Start with eight squares of kite paper. If you’d like to make a smaller star, carefully cut the larger squares into four equal squares. (Image 1)
- Fold one square in half, creating a rectangle, then unfold.
- Fold it in half in the opposite direction, then unfold. These folds serve as your guide to creating even lines. (Image 2)
- With your square flat and crease marks to guide you, fold each square corner toward the center point. This step results in a smaller square shape with flaps. (Image 3)
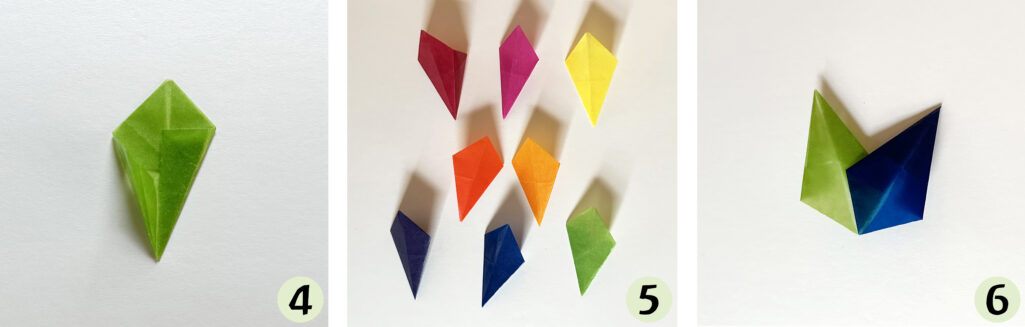
- Orient the square so it appears as a diamond shape.
- Fold one of the diamond's corners up into the center. Repeat the process with the opposite corner, creating a kite-like shape. (Image 4)
- Use your glue stick or craft glue to secure these two folded sides. This piece will form one point of your star.
- Follow the same steps with the remaining seven squares of paper. (Image 5)
- With all your star points complete, attach one piece to another on top of the folds, overlaying halfway into the smaller point. (Image 6)
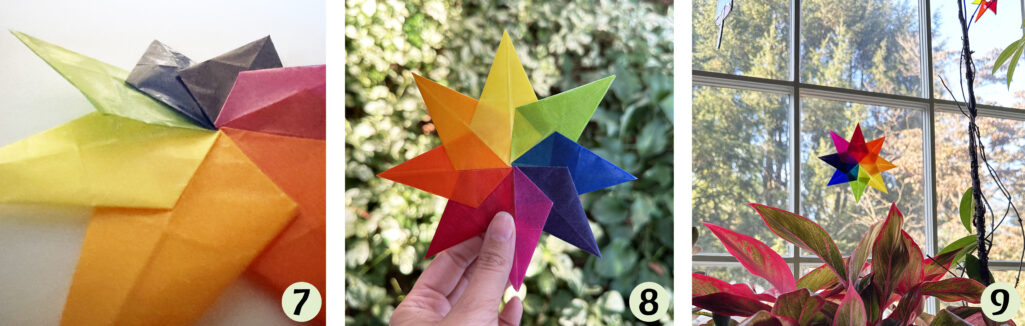
- Gradually add each segment, overlapping halfway into each small point, creating the star pattern. (Image 7)
- Tuck the final star point under the first to complete the star's symmetrical design. (Image 7)
- Inspect your star for any loose edges or gaps. Apply gentle pressure to ensure all points are securely fastened. (Image 8)
- Hang your Waldorf Window Star, allowing natural light to shine through the delicate kite paper. Witness the interplay of colors and shapes as your creation comes to life.
We hope these stars bring a bit of light and magic into your home and sparks the wonder of creativity every day.